- Home
- Wifi Installation Instructions
Wifi installation instructions for Smartphones & Tablets
Choose below
NetHome Plus for Android
How does the Wifi module installation process work?
Initially, turn on the "AP"operation in air conditioner. This means that the air conditioner now works as an Access Point (as a wireless modem / router. You create a NetHome Plus account in which you bind the air conditioner so that you can manage it outside of your homeύ. Then connect the unit to your home wireless network to access the internet via the router / modem.
Activate the air conditioner in "AP" operation
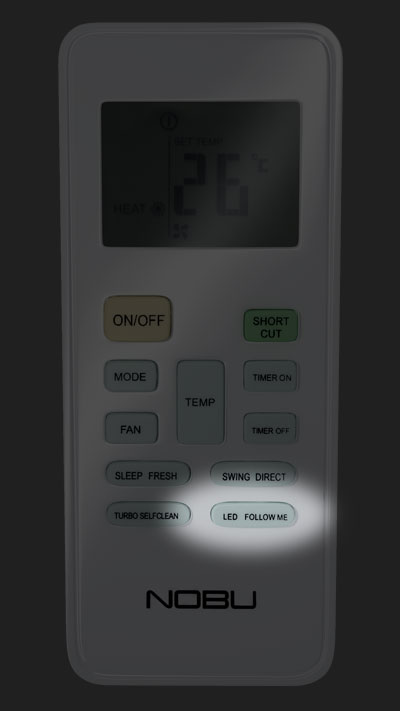
Unplug the air conditioner for 10 seconds. Reconnect the unit to power, and press the "LED" button of the controller repeatedly 7 times to display "AP" on the panel of the air conditioner. Note: For the next 3 minutes, the air conditioner does not receive commands from the remote control.
Step 1
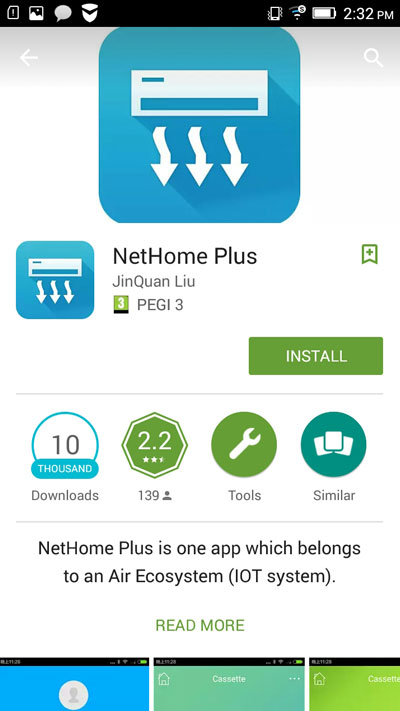
Install NetHome Plus on your mobile / tablet. Search at Play Store the following text: Nethome Plus or press here
Step 2
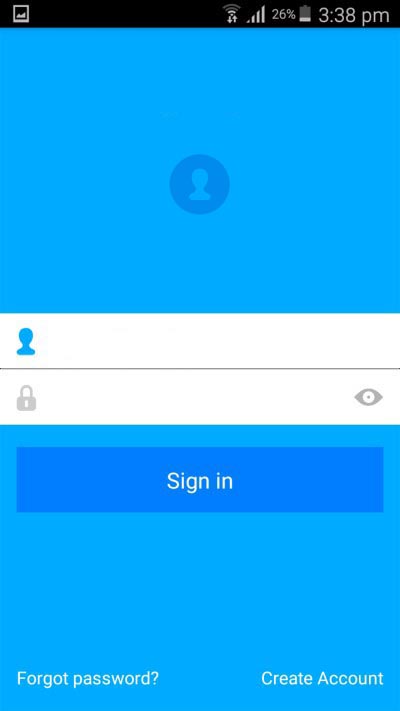
Select "Create Account" to create a new account
Step 3
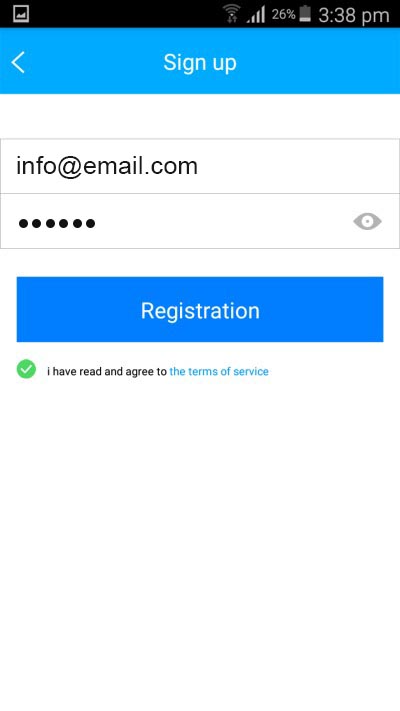
Fill in your email and a desired code (The code should consist of: 6-16 characters, lowercase or uppercase, without spaces) and press the button "Registration"
Step 4
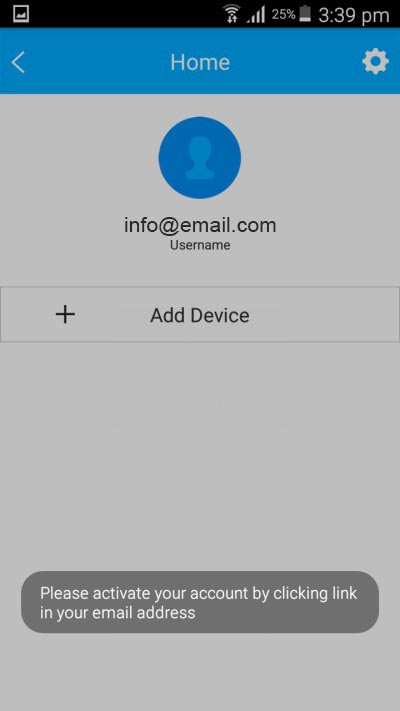
You will receive the above message
Step 5
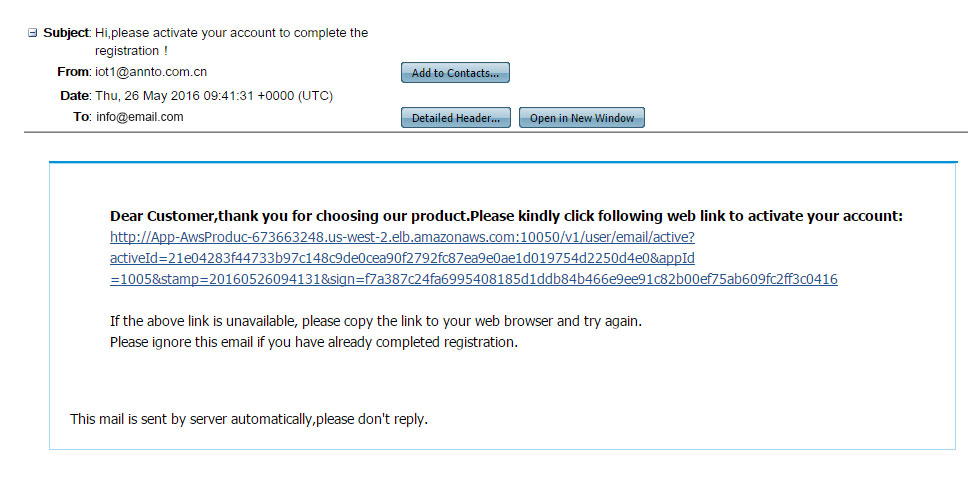
You must open the activation email sent to the email address you specified in the previous Step and follow the link on the activation email
Step 6
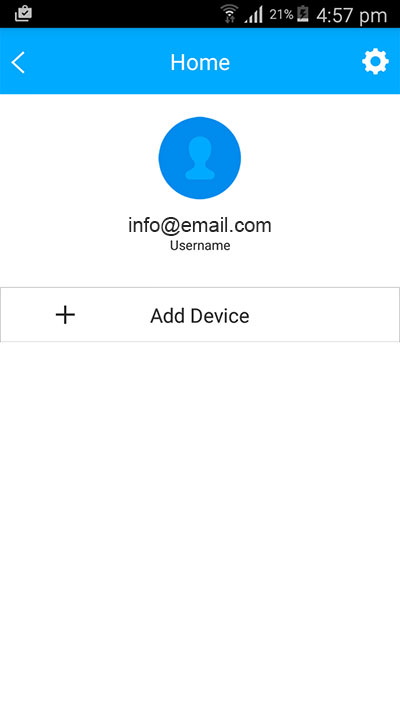
Once you reactivate your account, return to the NetHome Plus application. Choose "+ Add Device"
Step 7
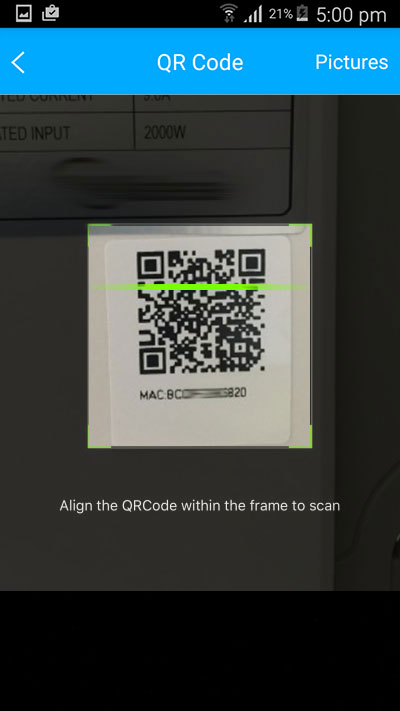
Scan the white sticker with the QR Code
Step 8
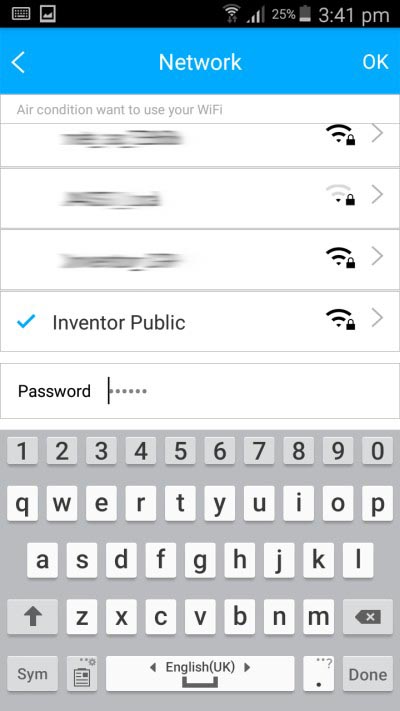
Select the wireless network of your location, fill in your password, and press "ΟΚ"
Step 9
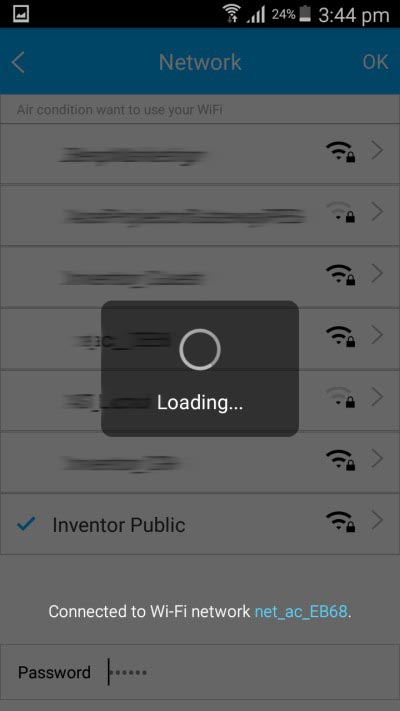
Wait until the process is complete (at this point the mobile is connected to your wireless network, then to the air conditioner and back to your wireless network)
Step 10
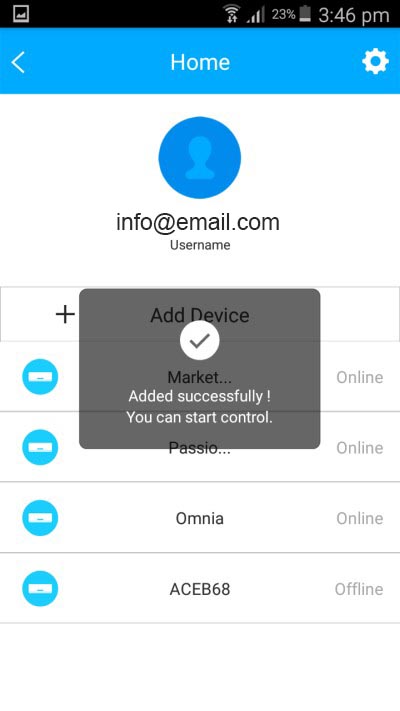
The air conditioner has been successfully connected to your wireless network. Press "ΟΚ"
Step 11
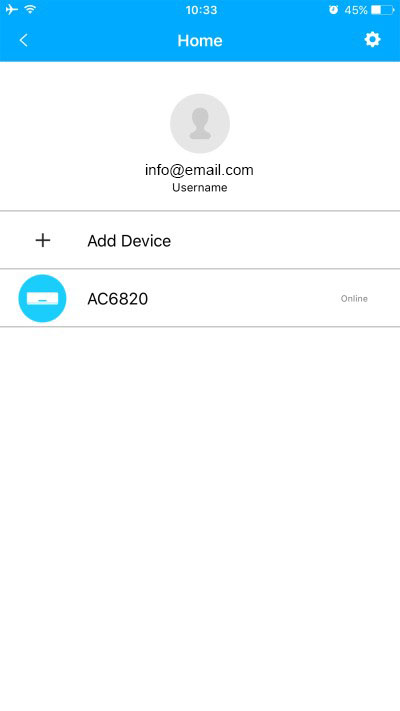
Choose the air conditioner unit(ex: AC6820)
Step 12
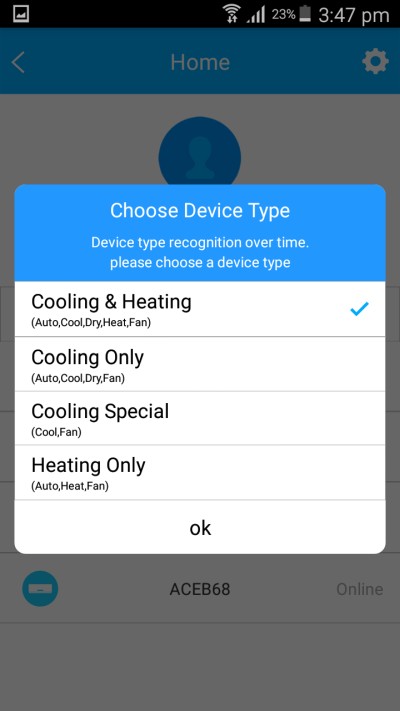
Choose the first option and press "ΟΚ"
Did you experience a problem?
NetHome Plus for iOS
How does the Wifi module installation process work?
Initially, turn on the "AP"operation in air conditioner. This means that the air conditioner now works as an Access Point (as a wireless modem / router. You create a NetHome Plus account in which you bind the air conditioner so that you can manage it outside of your home. Then connect the unit to your home wireless network to access the internet via the router / modem.
Activate the air condition in "AP" operation

Unplug the air conditioner for 10 seconds. Reconnect the unit to power, and press the "LED" button of the controller repeatedly 7 times to display "AP" on the panel of the air conditioner. Note: For the next 3 minutes, the air conditioner does not receive commands from the remote control.
Step 1b
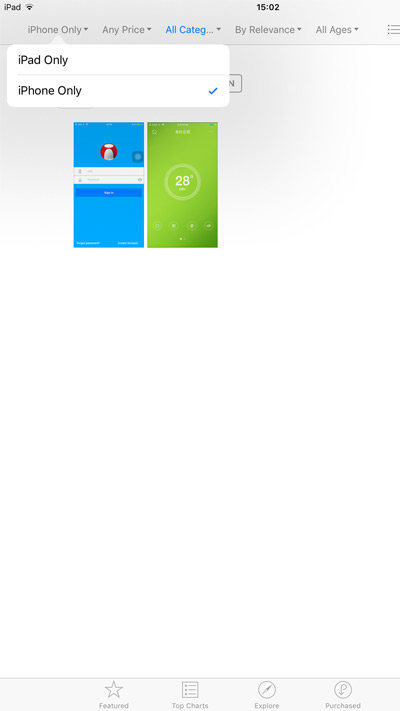
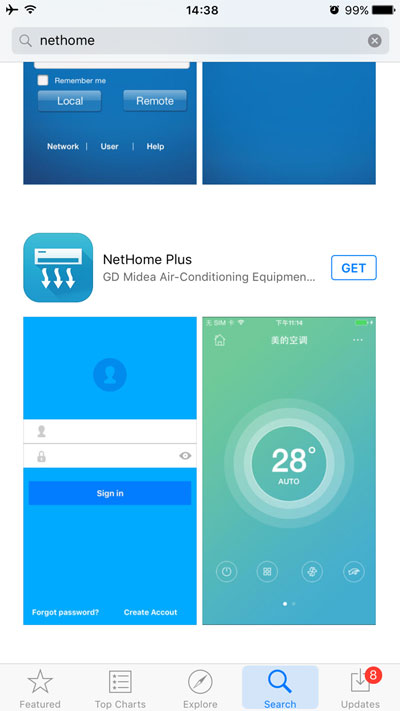
In case you use iPad, select "iPhone Only" as shown at the above image
Step 2
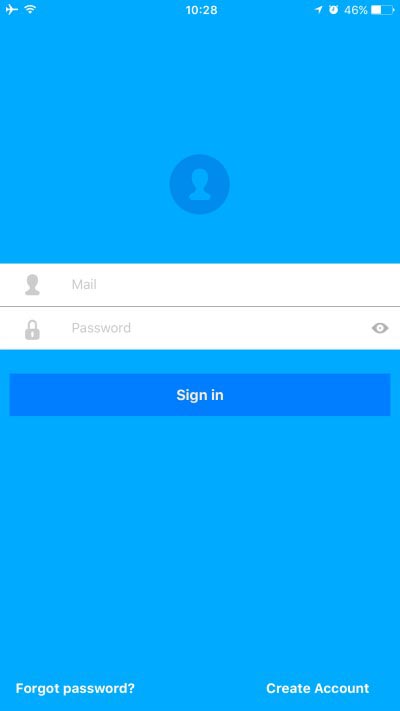
Choose "Create Account" to create an account
Step 3

Fill in your email and a desired code (The code should consist of: 6-16 characters, lowercase or uppercase, without spaces) and press the button "Registration"
Step 4
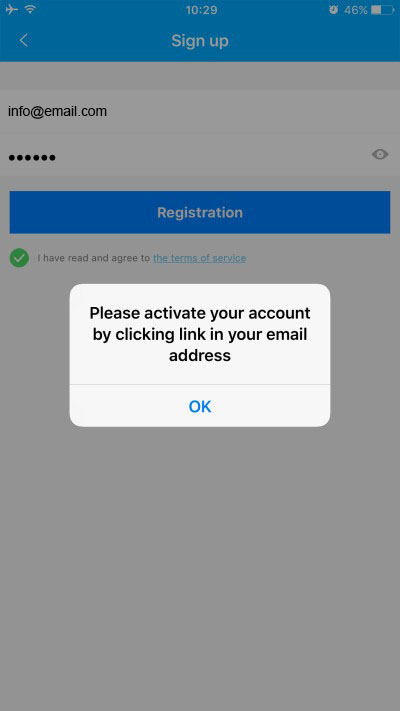
Press "ΟΚ" when the message appears
Step 5

You must open the activation email sent to the email address you specified in the previous Step and follow the link on the activation email
Step 6
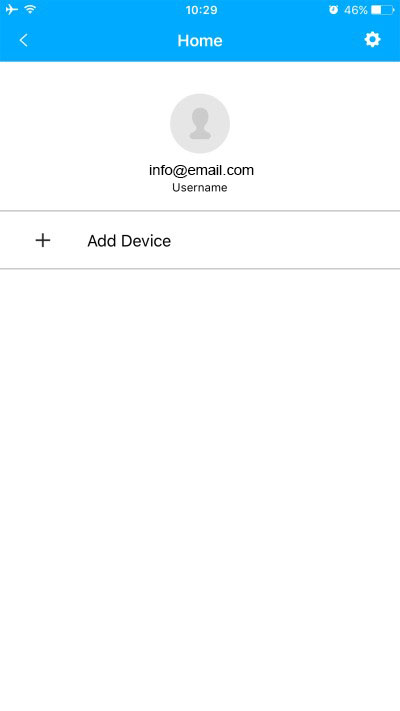
Once you reactivate your account, return to the NetHome Plus application. Choose "+ Add Device".
Step 7
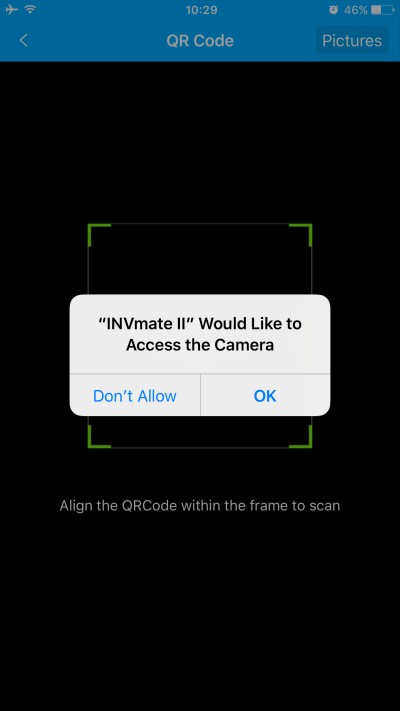
In case you see the below message. Press "ΟΚ" to let the application NetHome Plus to use your camera
Step 8
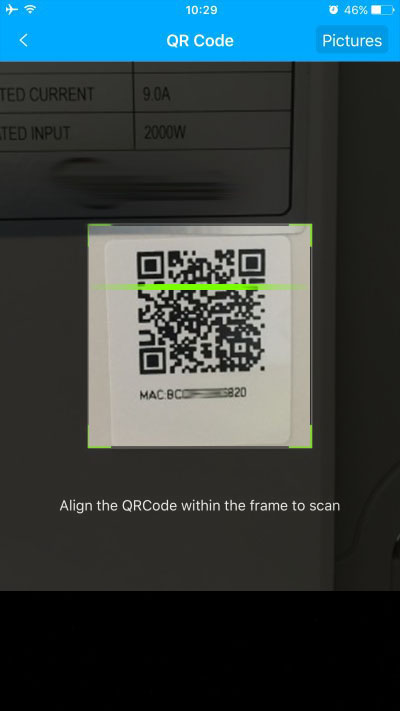
Scan the white sticker with the QR CodeQR Code
Step 9
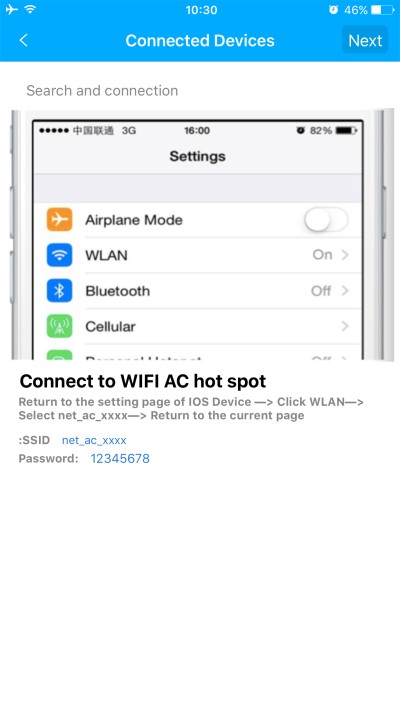
Follow the Step you see
Step 10
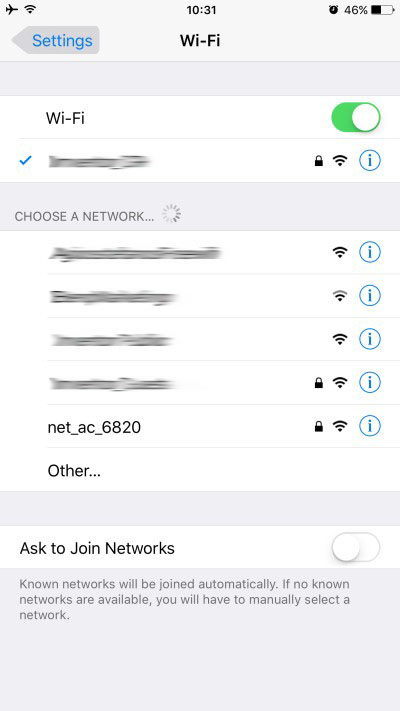
Go to your mobile device's wireless settings, look for the wireless network by name: netac####an then connect to that.
Step 11
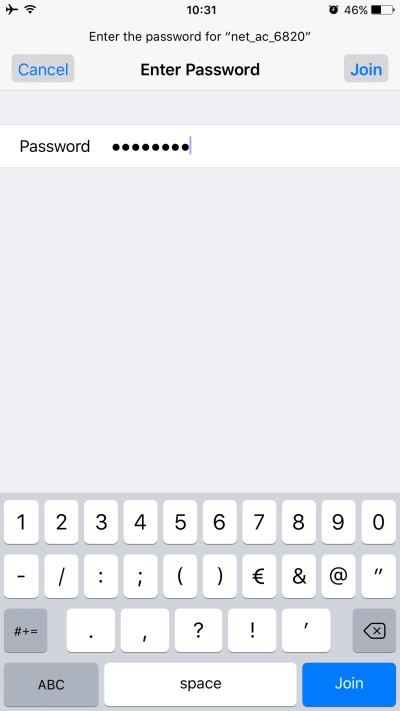
Fill in the code: 12345678 and press "ΟΚ"
Step 12
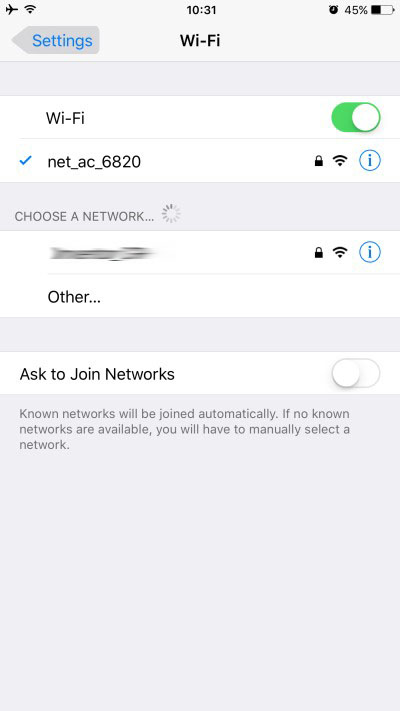
Be sure to connect to the wireless network successfully, as shown in the above image
Step 13
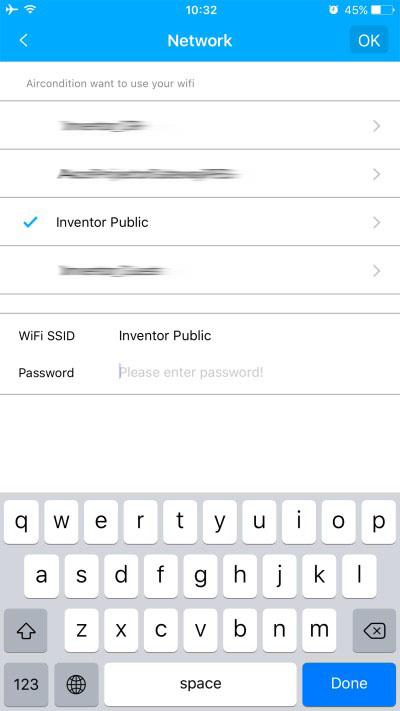
Return to the application NetHome Plus, from the list that appears select the place that is and the field "Password" fill the code of you wireless network. Press "ΟΚ"
Step 14
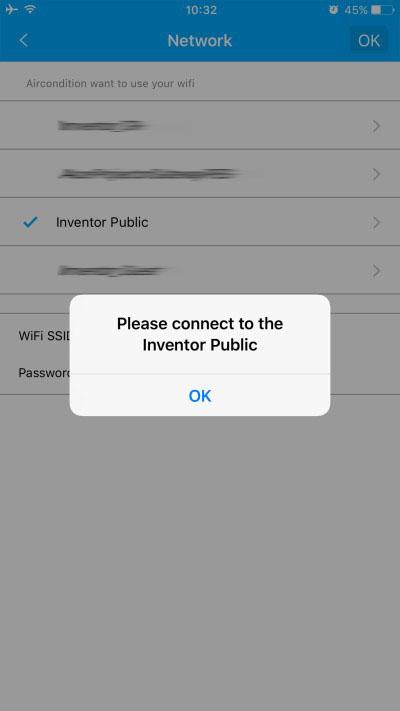
Press "ΟΚ" and then go again to the settings of the wireless network of your smarphone
Step 15
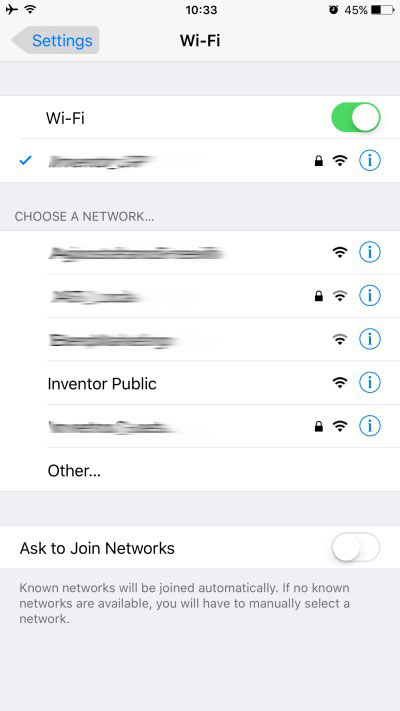
Reconnect of your wireless network. Return to the app NetHome Plus.
Step 16
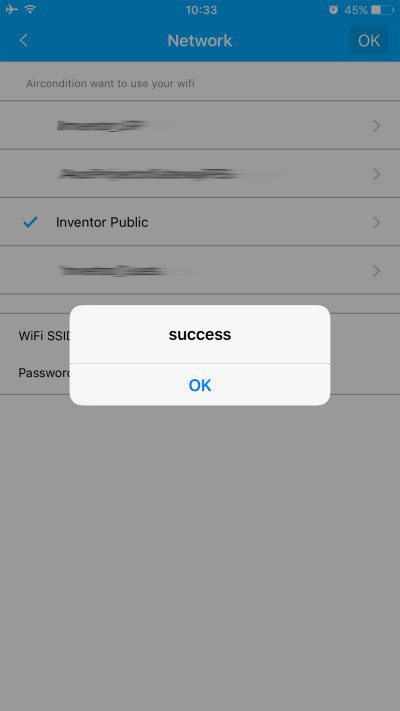
The air conditioner has been successfully connected to your wireless network. Press "ΟΚ".
Step 17

Choose the air conditioner unit(ex: AC6820)
Step 18
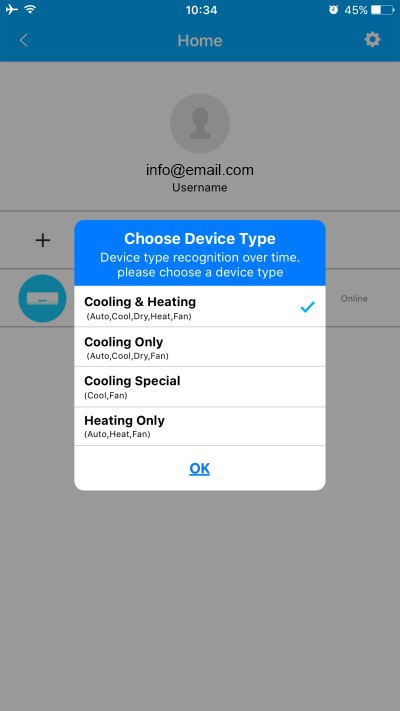
Choose the first option and press "ΟΚ".
Did you experience a problem?
EWPE Smart for Android (for Kimi series)
How to activate the Wi-Fi operation of your air conditioner
Via EWPE Smart application, create an account and connect your Smartphone with the air conditioner unit, in order to take control of your device from wherever and whenever you want. Join the air conditioning unit to your home network to have access to the internet.
Step 1
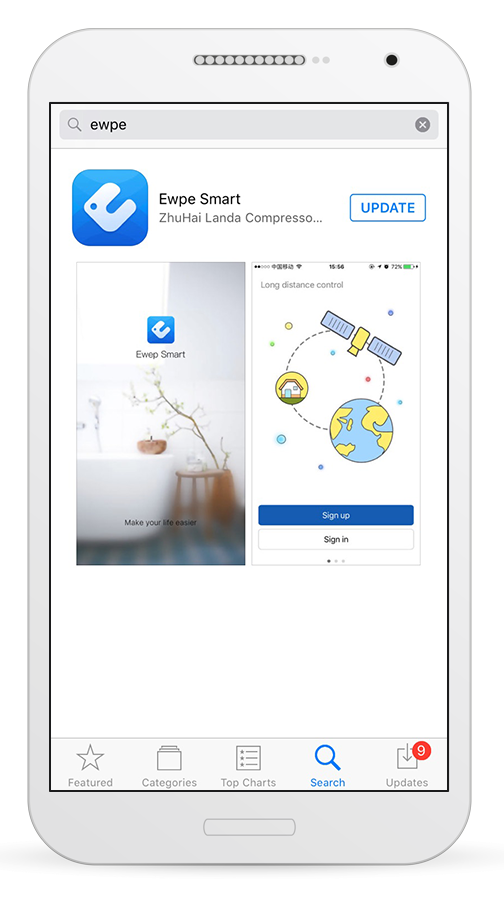
Download for free the EWPE Smart application through Google Play.
Step 2
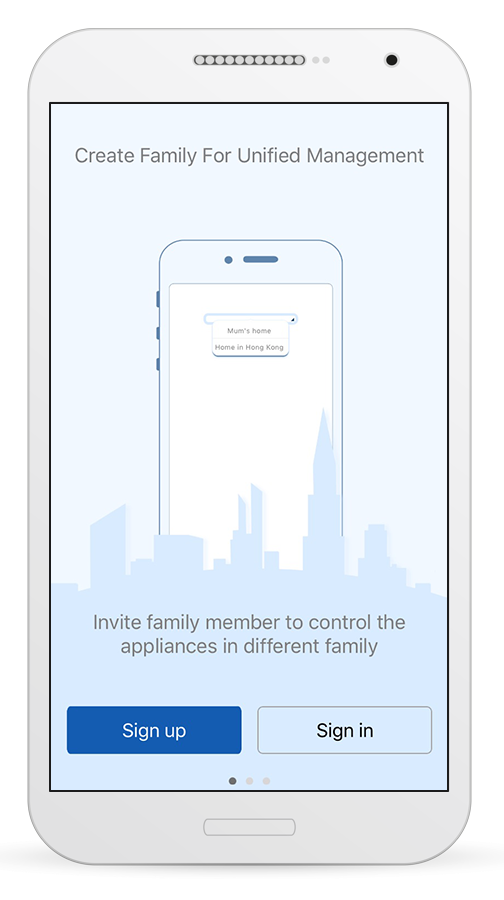
When the installation is completed, open the app to begin with the connection of your Smartphone with your air conditioner.
Step 3
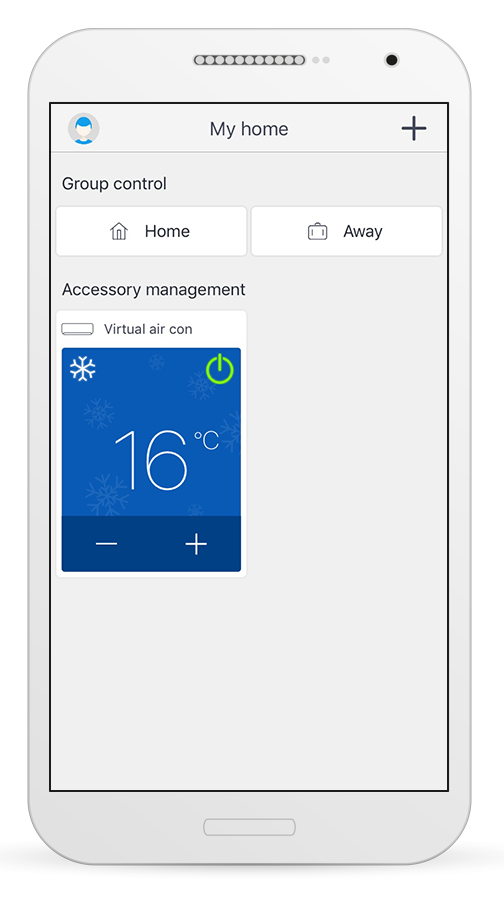
Select the icon on the upper left side of your mobile screen.
Step 4
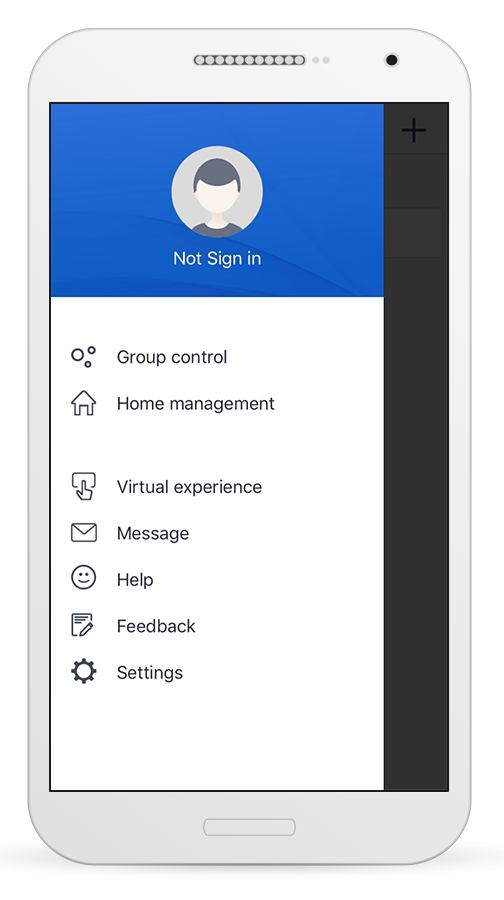
Select again the same icon at the upper side of your mobile screen.
Step 5
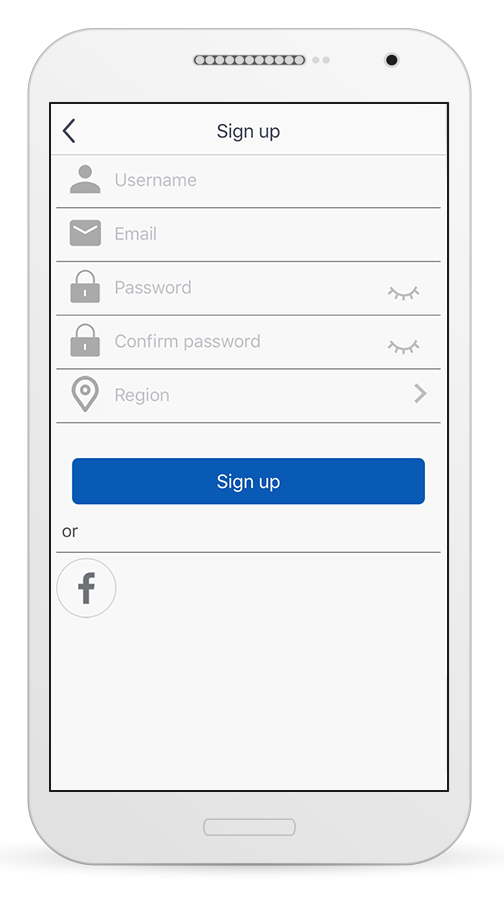
At that stage fulfill your email address and a password (the password must meet the following criteria: 6-16 alphanumeric characters, lower or uppercase, no spaces) and then press the "Sign Up" button.
Step 6
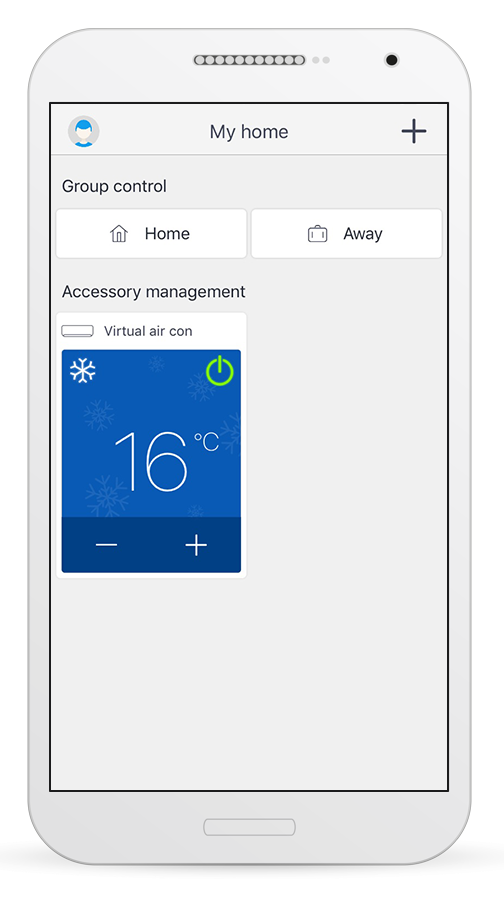
Press the "+" icon at the upper right side of the mobile screen.
Step 7
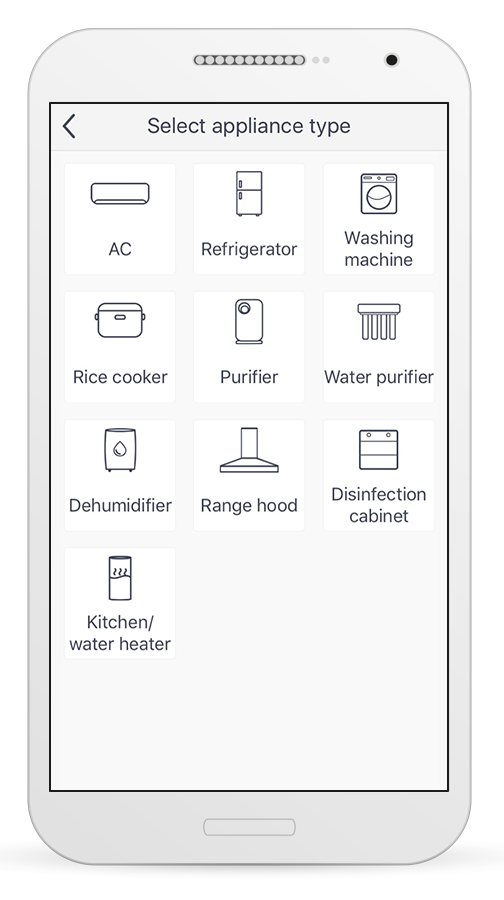
Select the type of the device you have purchased to connect with.
Step 8
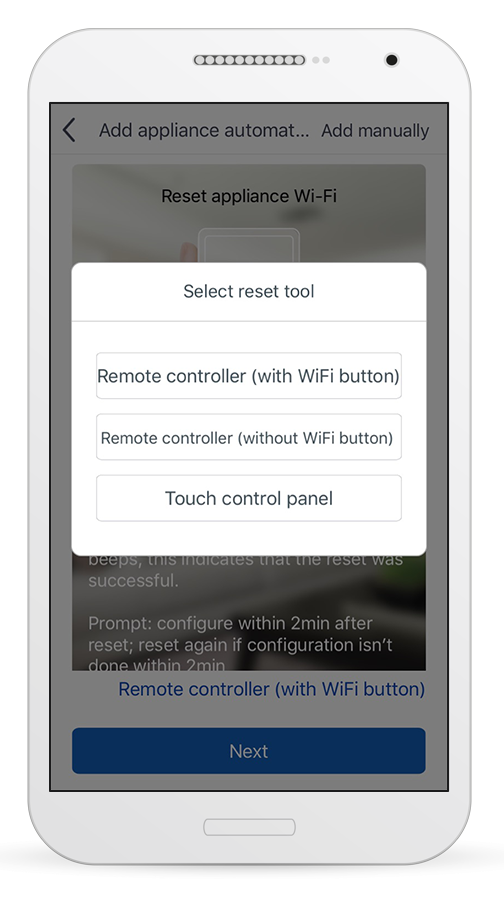
Press "Remote Controller with Wi-Fi button".
Step 9
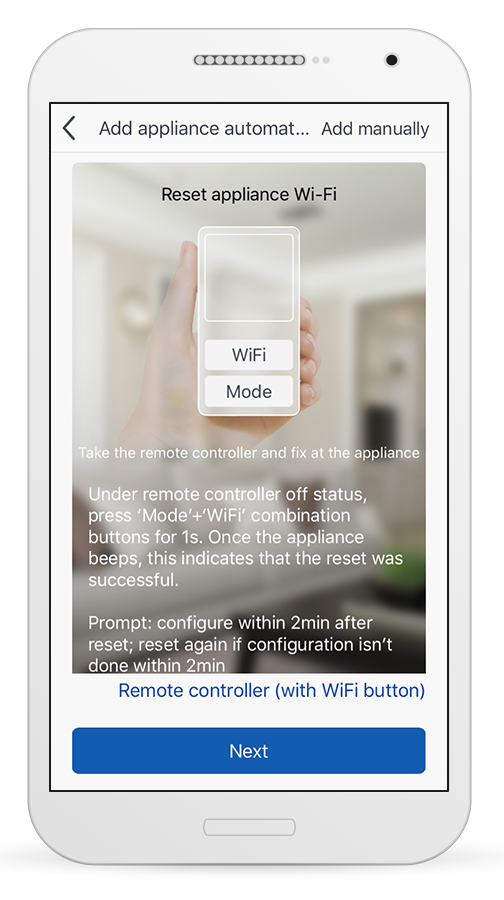
Follow the below steps that are mentioned on the above screen and afterwards select the button "Next":
1. Take the remote controller and fix at the appliance
2. Under remote controller off status, press Mode + Turbo combination buttons for 10s. once the appliance beeps for 2 seconds, this indicates that the appliance Wi-Fi reset was successful.
3. Prompt: configure within 2 min after reset; reset again if configuration isn't done within 2 min.
Step 10
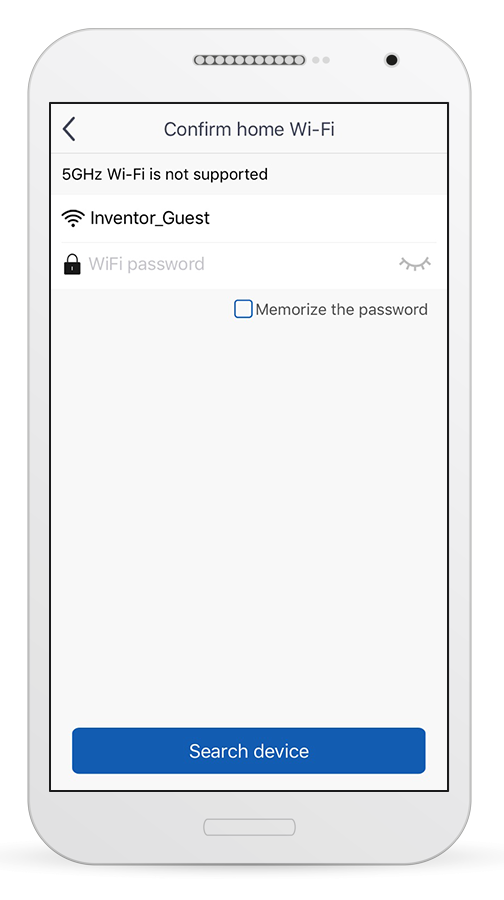
The application shows up all the available network connections, to select the one, you want to connect your device with. Fill all the necessary fields and press the "Search Device" to connect with your air conditioner.
*the 5GHz network is not supported
Step 11
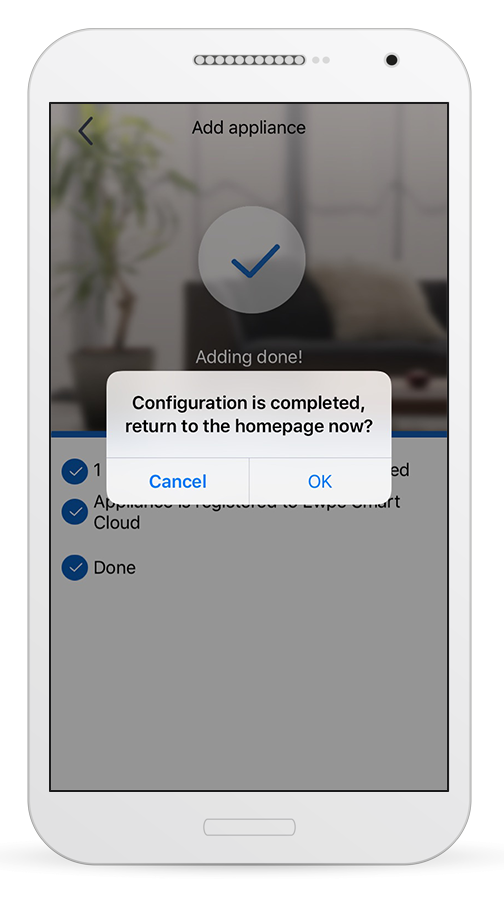
Your air conditioner has been successfully connected.
EWPE Smart for iOS (for Kimi series)
How to activate the Wi-Fi operation of your air conditioner
Via EWPE Smart application, create an account and connect your Smartphone with the air conditioner unit, in order to take control of your device from wherever and whenever you want. Join the air conditioning unit to your home network to have access to the internet.
Step 1
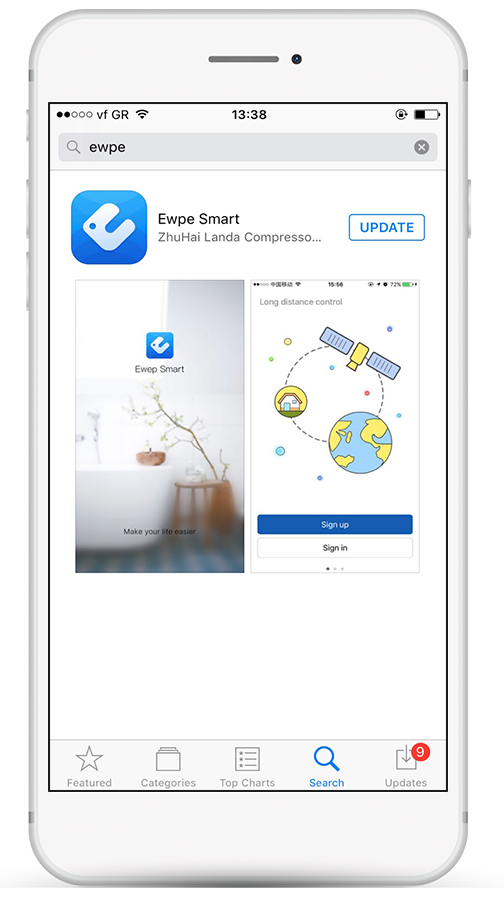
Download for free the EWPE Smart application through App Store.
Step 2
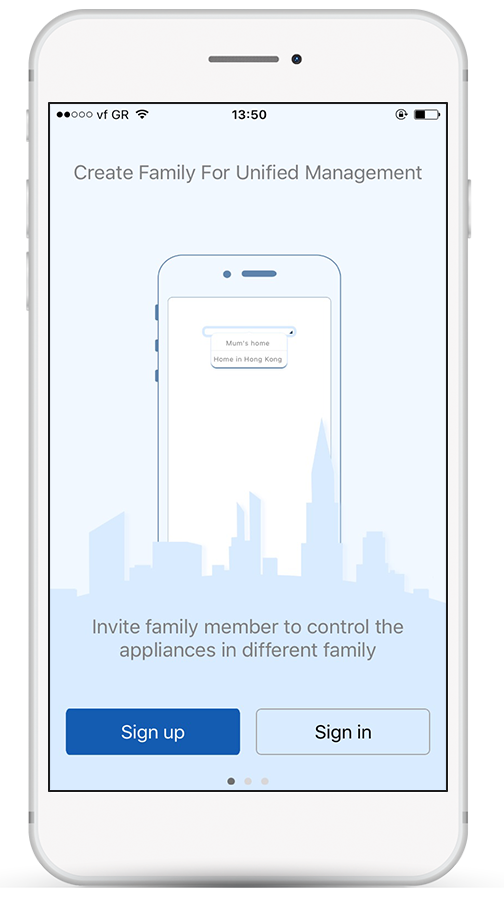
When the installation is completed, open the app to begin with the connection of your Smartphone with your air conditioner.
Step 3
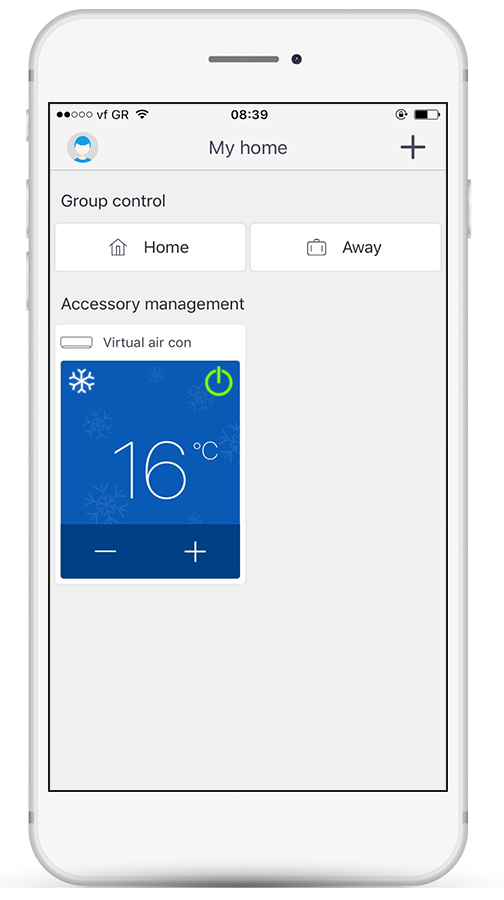
Select the icon on the upper left side of your mobile screen.
Step 4
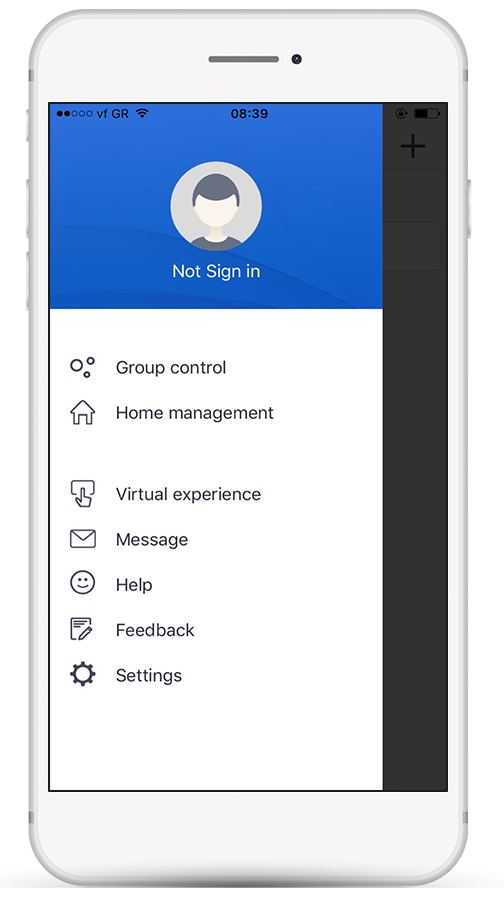
Select again the same icon at the upper side of your mobile screen.
Step 5
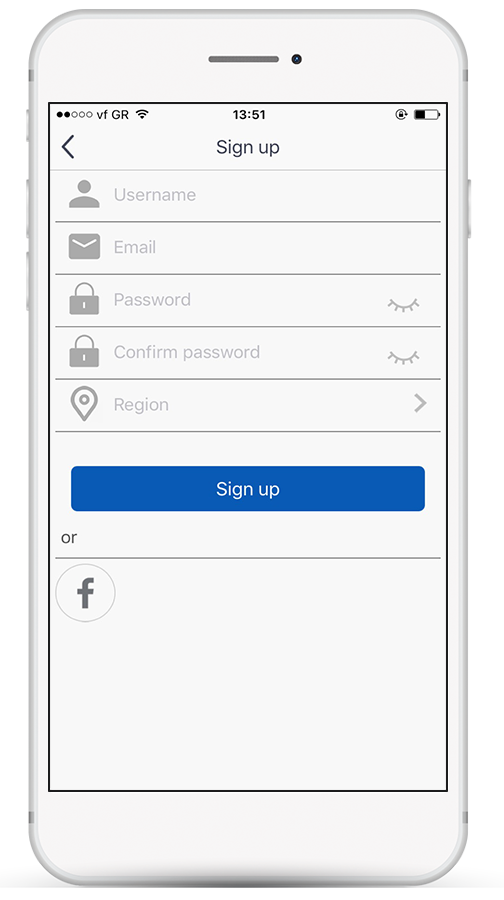
At that stage fulfill your email address and a password (the password must meet the following criteria: 6-16 alphanumeric characters, lower or uppercase, no spaces) and then press the "Sign Up" button.
Step 6
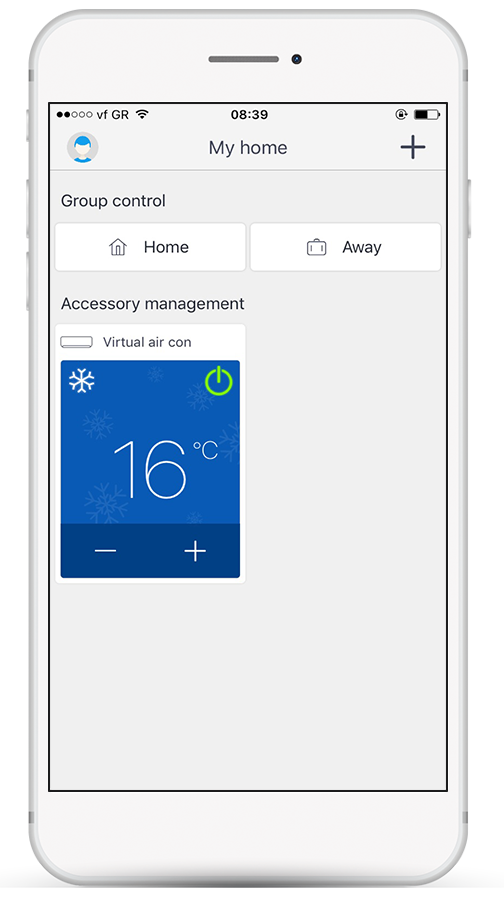
Press the "+" icon at the upper right side of the mobile screen.
Step 7
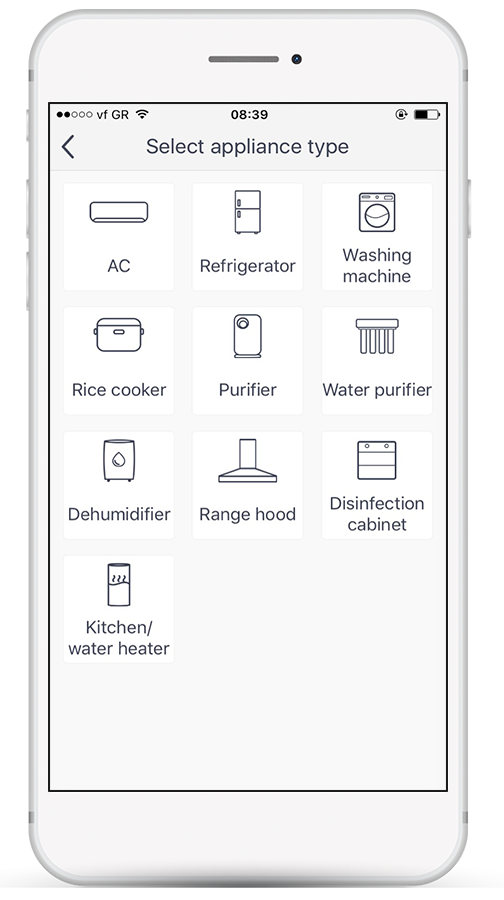
Select the type of the device you have purchased to connect with.
Step 8
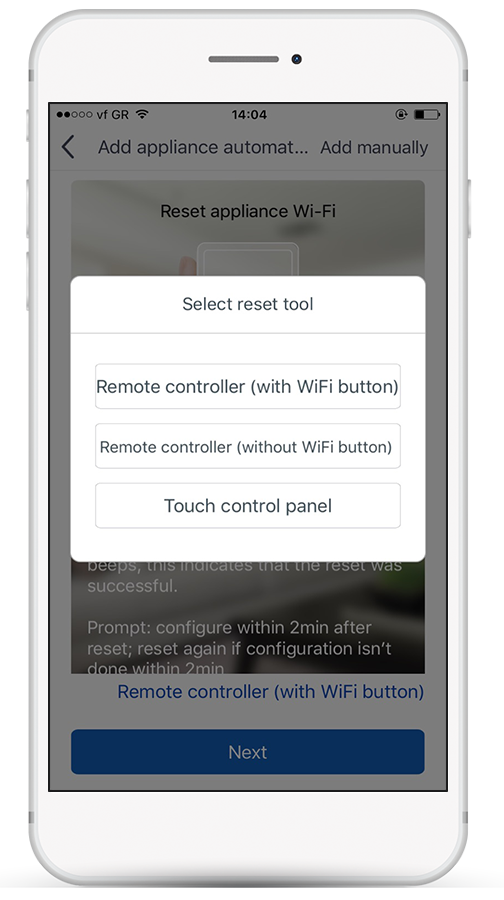
Press "Remote Controller with Wi-Fi button".
Step 9
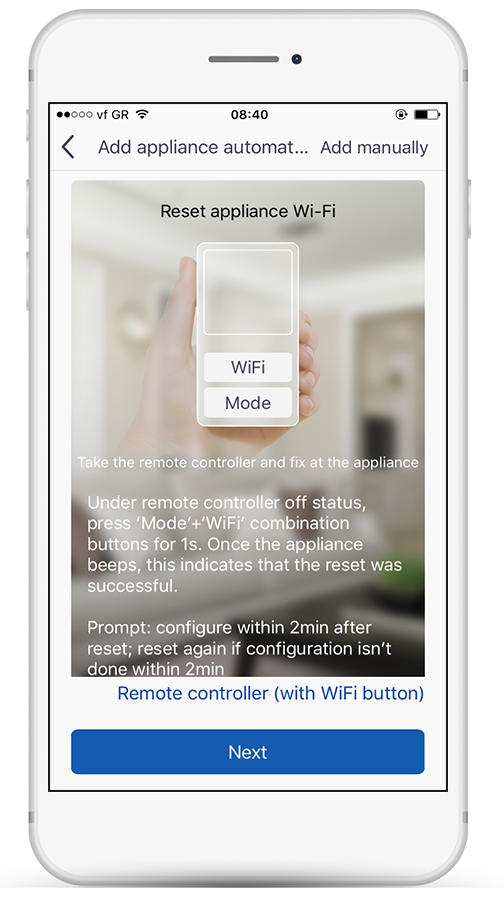
Follow the below steps that are mentioned on the above screen and afterwards select the button "Next":
1. Take the remote controller and fix at the appliance
2. Under remote controller off status, press Mode + Turbo combination buttons for 10s. once the appliance beeps for 2 seconds, this indicates that the appliance Wi-Fi reset was successful.
3. Prompt: configure within 2 min after reset; reset again if configuration isn't done within 2 min.
Step 10
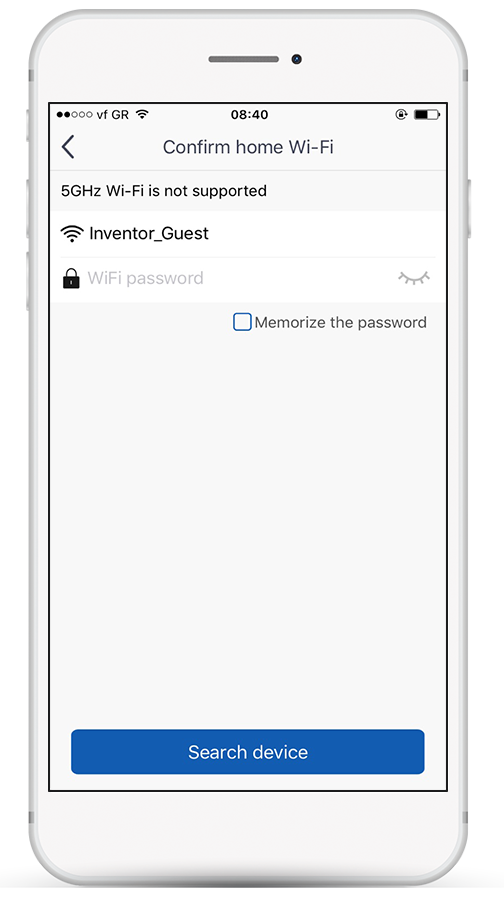
The application shows up all the available network connections, to select the one, you want to connect your device with. Fill all the necessary fields and press the "Search Device" to connect with your air conditioner.
*the 5GHz network is not supported
Step 11
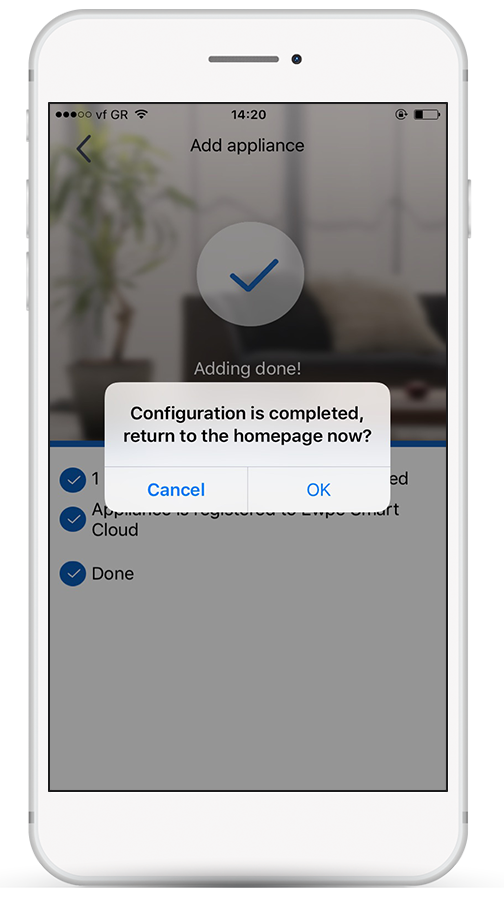
Your air conditioner has been successfully connected.
AC Freedom for Android
How to operate your airconditioner via Wi-Fi:
Step 1
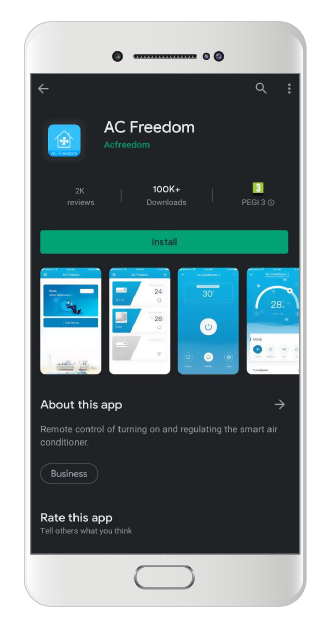
Search and download the AC Freedom application from Google Play.
Step 2
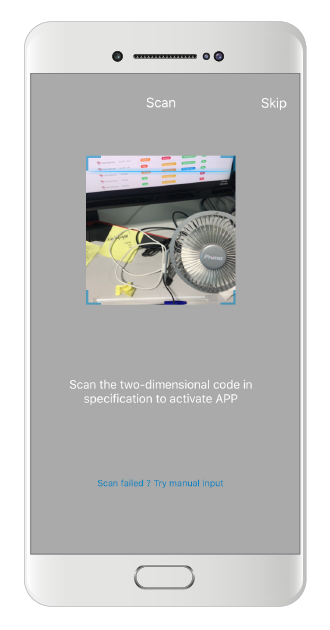
When prompted, scan the qr code provided in the equivalent page of the Wi-Fi User's Manual, or manually insert the activation code (6364d).
Step 3
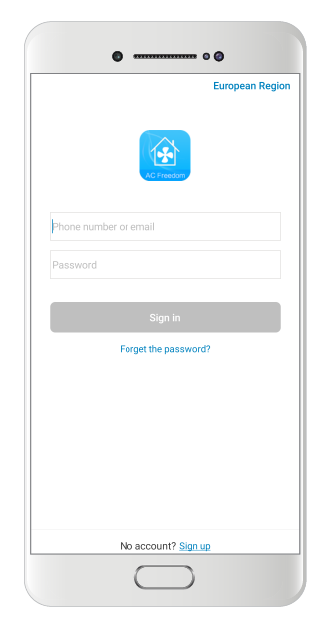
Select "Sign in" to create a new account.
Step 4
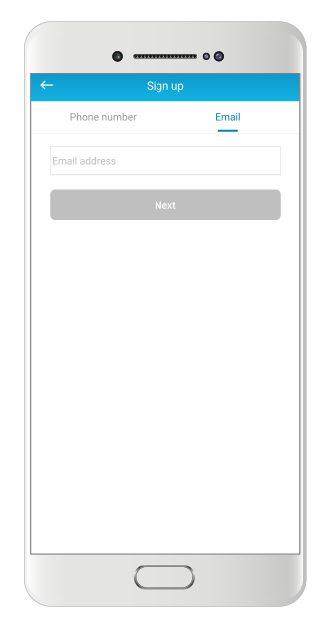
You can create an account with either your email address or with your phone number.
Step 5
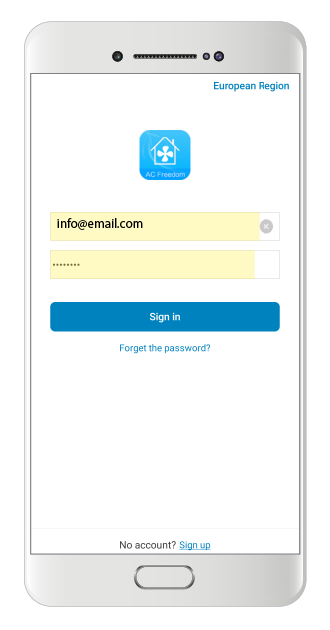
After you have created your account, enter your credentials to log in.
Step 6
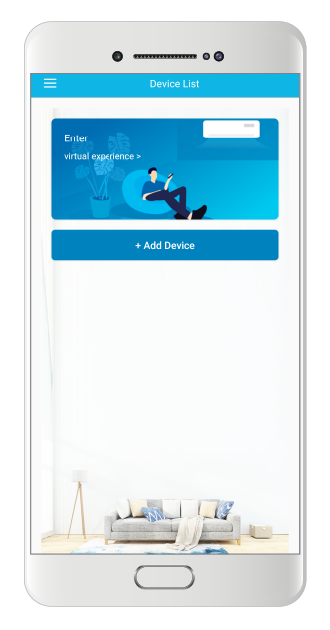
In the Home screen of the application, select "+Add Device" to start setting up your air conditioner with the app.
Step 7
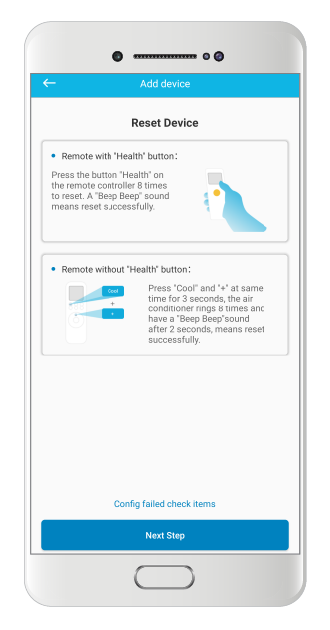
Reset your Air Conditioner from the remote controller, by pressing the "HEALTH" button 8 times, or by pressing together for 3 seconds the "Cool" and "+" buttons at the same time. 2 beeps will notify you that the reset was successful.
Step 8
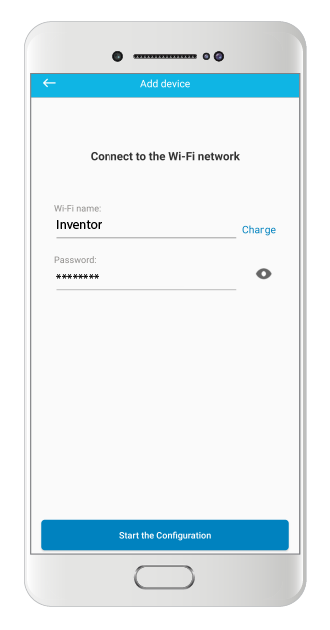
Select your local WLAN network and input the WLAN password.
Step 9
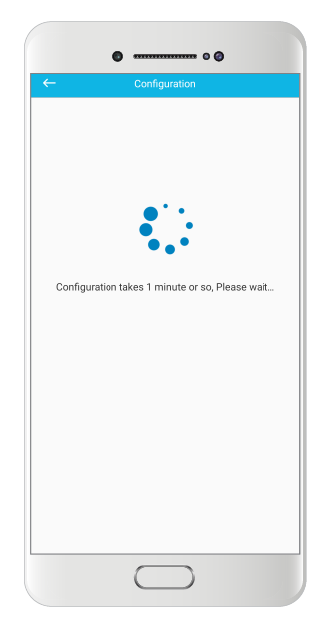
In approximately 1' the process will automatically be complete.
Step 10
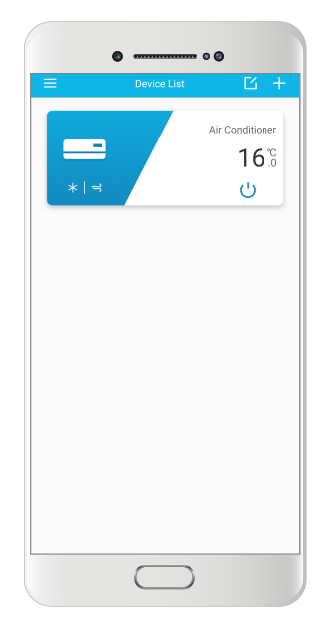
Your air conditioner will appear on the home screen of the application!
AC Freedom for iOS
How to operate your airconditioner via Wi-Fi:
Step 1
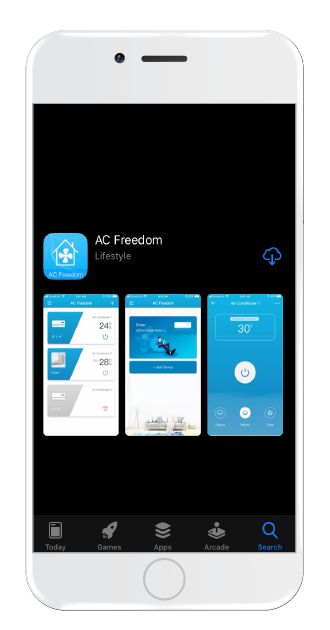
Search and download the AC Freedom application from App Store.
Step 2
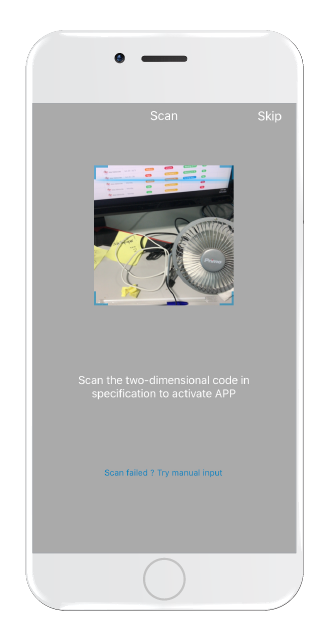
When prompted, scan the qr code provided in the equivalent page of the Wi-Fi User's Manual, or manually insert the activation code (6364d).
Step 3
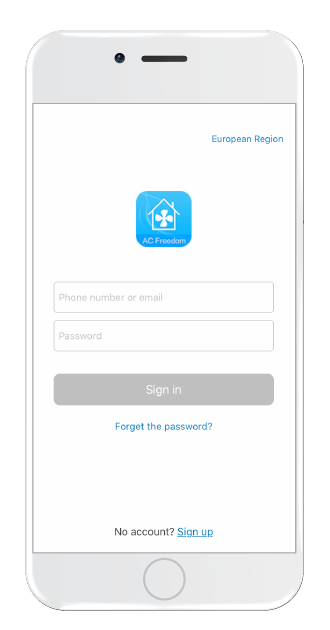
Select "Sign in" to create a new account.
Step 4
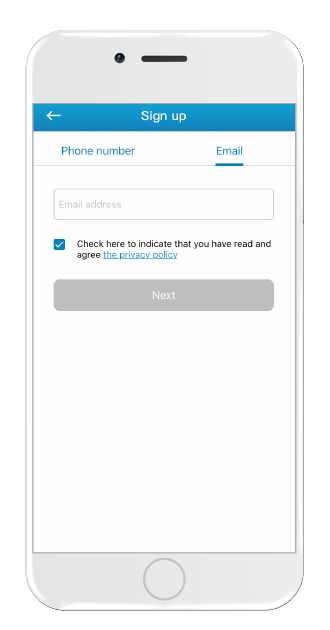
You can create an account with either your email address or with your phone number.
Step 5
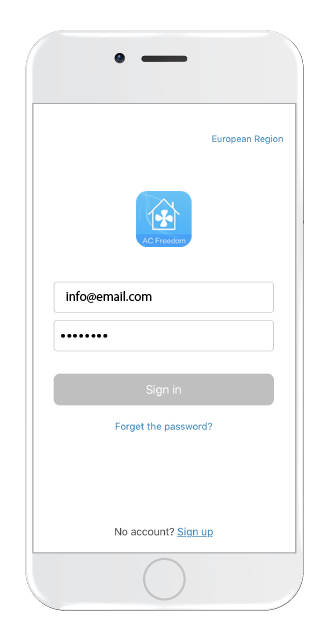
After you have created your account, enter your credentials to log in.
Step 6
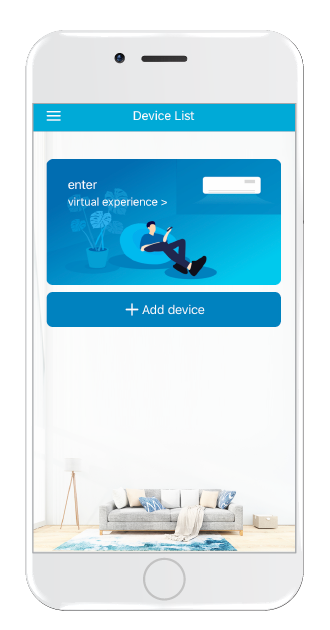
In the Home screen of the application, select "+Add Device" to start setting up your air conditioner with the app.
Step 7
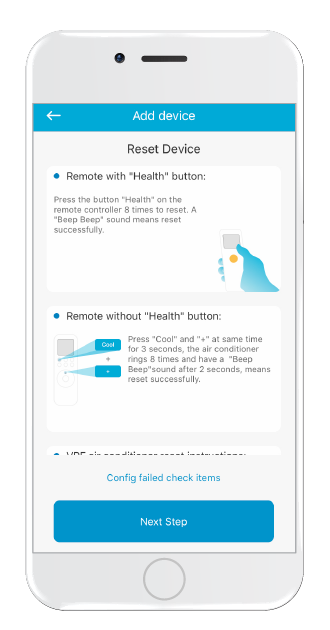
Reset your Air Conditioner from the remote controller, by pressing the "HEALTH" button 8 times, or by pressing together for 3 seconds the "Cool" and "+" buttons at the same time. 2 beeps will notify you that the reset was successful.
Step 8
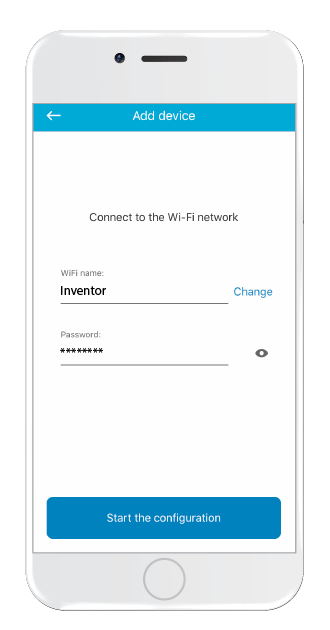
Select your local WLAN network and input the WLAN password.
Step 9
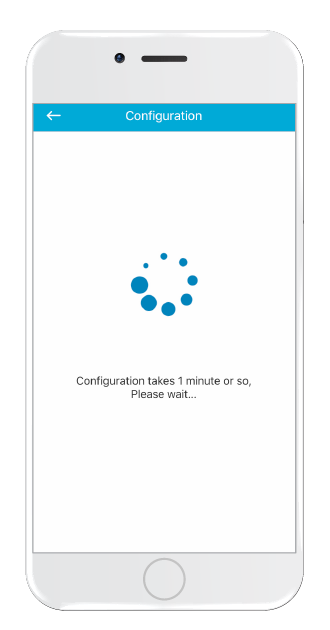
In approximately 1' the process will automatically be complete.
Step 10
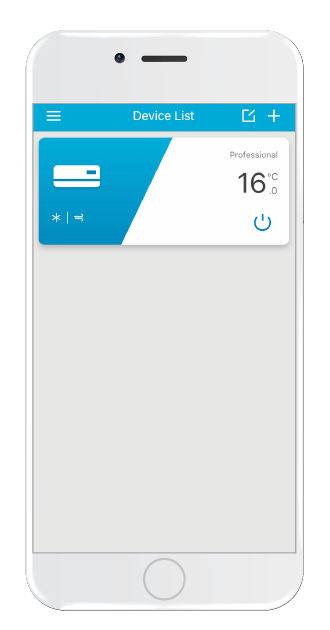
Your air conditioner will appear on the home screen of the application!
Kimi 9.000 / 12.000 Btu/h Installation
Step 1

Open the front panel of the air conditioner
Step 2

Unscrew the cover of the electrical box cover
Step 3

Find the cable with the blue plug
Step 4

Prepare the plug by removing the fuse
Step 5

Connect the Wi-Fi Module cable to the plug
Step 6

Insert the Wi-Fi module as shown in the figure and screw the screw
Step 7

Pass the cable as recommended in the picture to secure its position
Step 8

The installation has been successfully completed
Kimi 18.000 / 24.000 Btu/h Installation
Step 1

Open the front panel of the air conditioner
Step 2

Unscrew the cover of the electrical box cover
Step 3

Find the cable with the blue plug
Step 4

Prepare the plug by removing the fuse
Step 5

Connect the Wi-Fi Module cable to the plug
Step 6

Insert the Wi-Fi module as shown in the figure and screw the screw
Step 7

Pass the cable as recommended in the picture to secure its position
Step 8

The installation has been successfully completed
